pear + thyme tarts (df+gf)

I cook for a fair amount of small gatherings, outside of the ones that I cook at my own home. I am happiest when I am feeding people .... when my kitchen is in a state of organized chaos, my hands are busy chopping and washing, and I have about three recipes going at once. I love the process as much as I do the outcome …. the menu planning, the food shopping, the prepping. The moment when I think I might not finish everything in time, to that deep breath I take at the very end when everything magically comes together and it’s time to serve the food. That kind of craziness makes me feel calm in a way. That sounds weird, I know, and I am not sure how exactly to explain it. Maybe if you love the busyness of cooking as much as I do, you understand.
This summer I was working with my friend Heather to feed guests at her wellness retreats. We did a number of lunches, and a few dinners. I just cooked for her last event of the year this past Saturday, but this time I needed to make a three course meal that needed to be prepared ahead of time (the afternoon before), and pretty much just heated around dinnertime. We decided on a menu of roasted cauliflower soup, classic kale salad, yellow squash curry, and these pear tarts here, for dessert. Planning the meal is always one of my favorite parts, and since we both agree that we like to keep the meals as local as possible, we use most of the ingredients from the farm and local markets. That makes our menu, naturally, very seasonal. So seasonal, that the menu will often change last minute based on what I find at the farm stand and what looks really good. We talked about doing some chocolate dessert thing, but when I went to the farm stand and found all of these beautifully ripe pears, I grabbed them because ..... that was going to be dessert.
Since a lot of the cooking that I do requires me to prep as much as possible at home, pack it up, then heat and assemble later ….. I am always looking for recipes that I can do the bulk of the work a day or few hours in advance, and that will taste just as good (if not better) when cooked up again later. When it comes to dessert, I always think that is the first thing that you should get out of the way when cooking a full menu. I never think you should be making dessert during or (even worse) after the main course is served. I’ve learned this the hard way. Dessert should be done, before your guests arrive, maybe even a day in advance (if possible) and should require no more than heating or assembling.
Pies, tarts, and crisps are some of my favorite desserts to serve. They have a rustic, comfy feel, and always make people happy. Coming up with these desserts that are both dairy-free AND gluten-free (and rival the ones with all those goods) is never easy, so when I find and make one that’s a winner …. I know I have to share it here.
These tarts are ever so slightly adapted from one of my favorite cookbooks: At Home in the Whole Foods Kitchen. The only real change I made was with the thyme, mostly because I had a lot left over from my garden that I needed to use, and also because I love the addition of herbs to desserts. They add another element of flavor that’s a bit unexpected. Last year I paired pears with sage in this baked oatmeal dish, and this year it’s thyme. A little bonus of adding herbs to desserts is that you can artfully place some extra sprigs on top to make your dessert look super pretty.


pear + thyme tarts
**These tarts are ever so slightly adapted from one of my favorite cookbooks: At Home in the Whole Foods Kitchen by Amy Chaplin
MAKES 8 mini tarts
INGREDEINTS
For the filling:
1 cup + 1 tablespoon of pear nectar (divided)
¼ cup of agar flakes
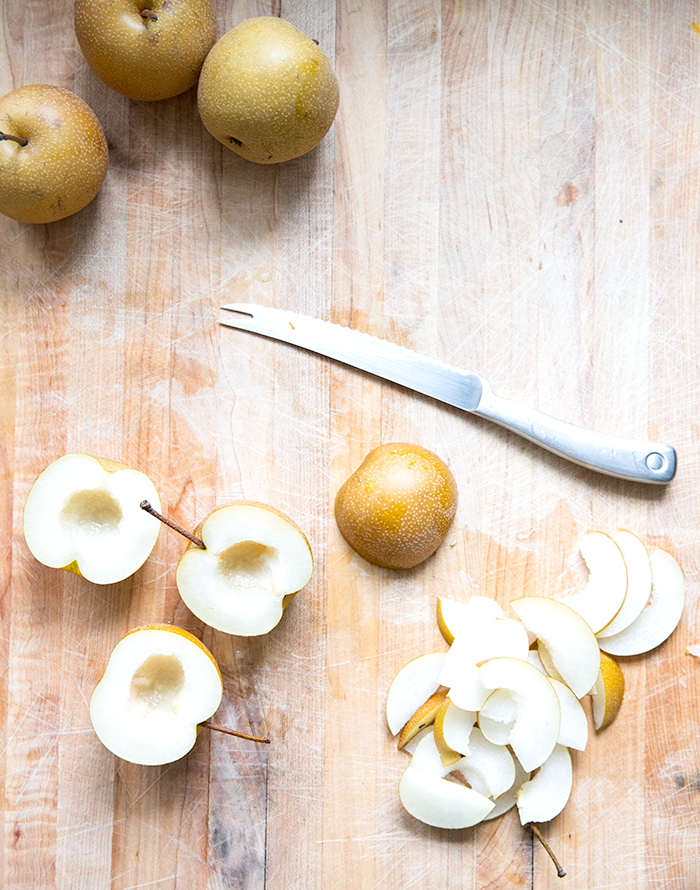
3 ripe pears (such as bartlet), seeded and diced
1 teaspoon of fresh thyme, minced
1 tablespoon of arrowroot powder
¾ cup of cashews (soaked for 2 hours min, or overnight)
1 tablespoon of maple syrup
1 vanilla bean, scraped (or 1 teaspoon of vanilla extract)
for the crust:
1 cup of rolled oats
1 cup of almond meal
¼ cup of brown rice flour
¼ cup of coconut flour
¼ teaspoon of sea salt
2 tablespoons of extra virgin olive oil
2 tablespoons of melted coconut oil (plus more for greasing)
1/4 cup of maple syrup
2 teaspoons of vanilla extract
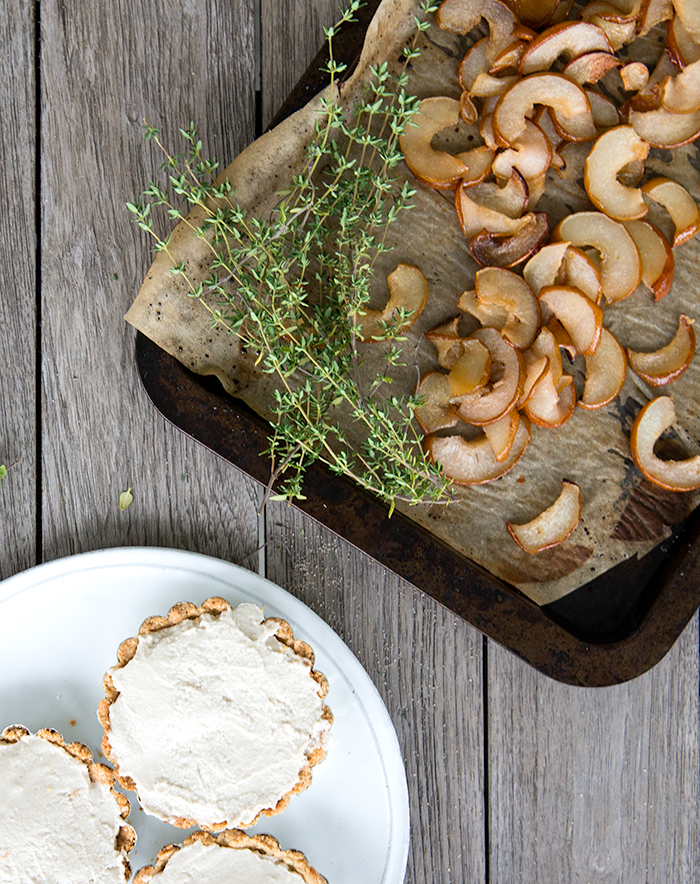
for the roasted pear topping:
3 firm pears (such as bartlet), peeled and sliced thinly lengthwise
a drizzle of olive oil
a drizzle of maple syrup
some fresh thyme sprigs for garnish
METHOD
Make the filling:
- In a medium, heavy bottomed pot, whisk together the agar flakes and pear nectar and bring it to a boil over high heat. Cover the pot, reduce the heat to low, and simmer for 10 minutes.
- Add the pears and thyme to the pot, raise the heat to medium-high and bring it to simmer while stirring. Cover, reduce to low, and cook for 5 minutes until the pears are super soft.
- In a small bowl, dissolve the arrowroot in the remaining tablespoon of pear nectar. Drizzle that into the pear / agar mixture. Stir to incorporate, and keep stirring for a minute or two until the mixture has thickened. Remove from the heat, and allow it to cool slightly (before you add it to the blender)
- Place the drained cashews, maple syrup, and vanilla into a high-powered blender and add the pear / agar mixture. Make sure the top to the blender is secured on tight. Blend (on low) until smooth, then increase the speed a little until the mixture is super smooth.
- Transfer the mixture to a bowl, and let it set in the fridge for an hour. If you like, you can do this up to 3 days in advance, and store this mixture in an air-tight container in the fridge until you're ready to serve the tarts.
Make the crust:
- Place the oats, almond meal, brown rice flour, coconut flour, and salt into a food processor and blend until finely ground. Transfer the mixture to a bowl, and drizzle in the olive oil and coconut oil. Stir to combine. Add the maple and vanilla and stir again. Set the wet mixture aside for 20 minutes.
- Pre-heat the oven to 350º.
- Oil the tartlet pans with coconut oil. For best results, line the the pans with oiled parchment circles (this allows the tarts to release from the pans a little more seamlessly). Press the dough into the pans. Spoon a couple tablespoons of the dough into the pan, and press the dough into the shape of the pan using your fingers. Pick the bottom with a fork. Place all of the dough-lined tins onto a larger baking sheet and bake for 8 minutes, turn the baking sheet, and bake for another 8 minutes. Remove and allow to cool completely before filling.
While the crust is cooling, roast the pears for the topping:
- Raise the oven temp to 400º.
- Place the sliced pear onto a parchment lined baking sheet, and toss with the olive oil and maple syrup.
- Roast the pear for 25-30 minutes, until golden brown. When cool enough to handle, transfer the roasted pears to a small bowl (otherwise they will harden and stick to the parchment).
Assemble the tarts:
- Assemble the tarts shortly before you're ready to serve. You can also do this up to a day in advance.
- Give the pear cream a good stir to loosen it up and keep stirring it until it's smooth.. Then, spoon a small-ish amount of the pear cream into the tart crust (divide the cream evenly amongst the tarts) and smooth the top using a butter knife. Finish with 3-4 slices of the roasted pears and a sprig or two of thyme on each for garnish. If not serving immediately, keep in the fridge until you're ready to serve.